How to Take a Screenshot on a Windows Laptop
Windows laptops provide multiple methods to capture your screen, from dedicated keys to integrated tools. Here are the most popular options.
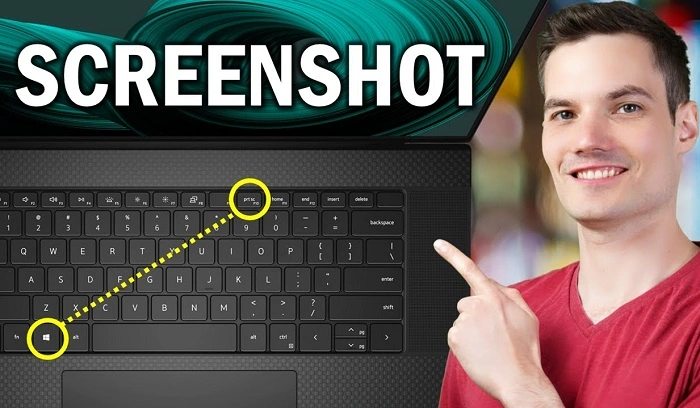
Using the Print Screen (PrtScn) Key
The Print Screen (PrtScn) key is the quickest way to take a screenshot on most Windows laptops. Here’s how it works:
- Capture the Entire Screen: Press the
PrtScnkey. This will copy the entire screen to your clipboard. You can then paste it into an image editor like Paint by pressingCtrl + V. - Save the Screenshot Directly: Press
Windows + PrtScnto capture the screen and save it automatically in theScreenshotsfolder, located within thePicturesfolder. - Capture Only the Active Window: Press
Alt + PrtScnto take a screenshot of the currently active window. You’ll still need to paste it into an app to save it.
Snipping Tool
The Snipping Tool is a built-in Windows application that lets you select a custom part of the screen to capture.
- Open Snipping Tool: Type “Snipping Tool” into the Windows search bar and open it.
- Choose a Mode: Select from modes such as Free-form Snip, Rectangular Snip, Window Snip, or Full-screen Snip.
- Capture the Screenshot: Click “New” and select the area you want to capture.
- Save or Copy: You can then save, edit, or copy the snip to use in other applications.
Snip & Sketch Tool
Windows 10 and 11 introduced the Snip & Sketch tool as an improved version of Snipping Tool.
- Launch Snip & Sketch: Press
Windows + Shift + S. Your screen will darken, and you’ll see a toolbar at the top. - Select a Capture Type: Choose from Rectangular Snip, Freeform Snip, Window Snip, or Full-screen Snip.
- Edit and Save: Once captured, your snip opens in the Snip & Sketch editor where you can edit or save it.
Also Read: How Does Light Travel? Understanding the Journey of Light
Windows + Shift + S Shortcut
For Windows 10 and 11 users, the Windows + Shift + S shortcut is the fastest way to capture a specific part of your screen without opening any applications.
- Press Windows + Shift + S: Your screen dims, and a snipping toolbar appears.
- Select the Snip Area: Choose the area you want to capture. This will automatically copy it to the clipboard.
- Paste in an Editor: Paste the screenshot directly into a document or an image editor.
How to Take a Screenshot on a Mac Laptop
Mac laptops use slightly different methods for taking screenshots, focusing mainly on keyboard shortcuts.
Using Keyboard Shortcuts
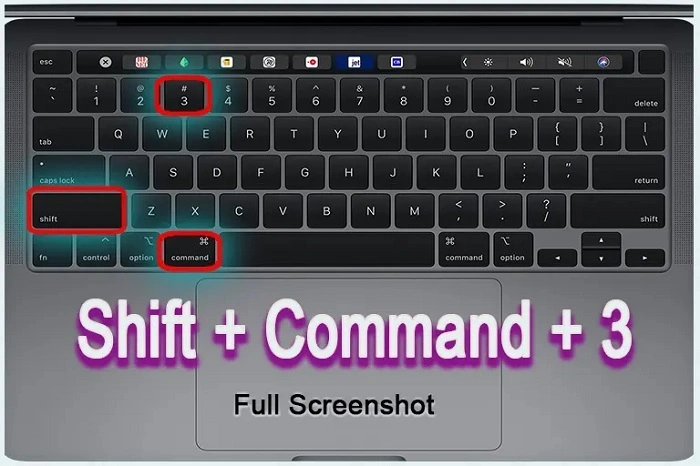
- Capture the Entire Screen: Press
Command + Shift + 3to capture the entire screen. The image will save to your desktop. - Capture a Specific Area: Press
Command + Shift + 4to bring up crosshairs, allowing you to drag and select an area to capture. - Capture a Window: Press
Command + Shift + 4, then press the Spacebar. This changes the cursor to a camera, allowing you to click on any open window to capture it.
Screenshot App
Starting with macOS Mojave, Apple introduced a Screenshot app with more options.
- Open Screenshot: Press
Command + Shift + 5to open the Screenshot app. - Select Mode: The app allows you to capture the entire screen, a selected portion, or a window.
- Record Video or Take Still Screenshots: The app also includes video recording options, allowing you to record screen activities along with capturing screenshots.
How to Take a Screenshot on a Chromebook
Chromebooks make capturing screenshots straightforward with keyboard shortcuts designed specifically for this purpose.
Using Keyboard Shortcuts
- Capture the Entire Screen: Press
Ctrl + Show Windows(theShow Windowskey looks like a rectangle with two lines on the right). - Capture a Selected Area: Press
Ctrl + Shift + Show Windows. Your cursor will change, and you can click and drag to select the area.
Using the Power and Volume Down Keys
If you’re using a Chromebook in tablet mode:
- Press Power + Volume Down: This will capture the entire screen and save the image in the Downloads folder.
Third-Party Screenshot Tools for Any Laptop
Several third-party applications work across operating systems and provide additional editing and annotation tools for screenshots. Some popular options include:
- Lightshot: A lightweight app for Windows and Mac that allows you to quickly capture any part of your screen and edit it immediately.
- Greenshot: A Windows-exclusive tool that’s easy to use and comes with multiple editing features.
- Snagit: Offers advanced features, including video capture, scrolling capture, and annotation tools.
- Gyazo: This tool captures images and screen recordings, automatically saving them to your account for easy sharing.
Tips for Taking Better Screenshots
Taking screenshots might seem simple, but there are ways to make them more effective:
- Use High Resolution: Ensure your laptop’s display resolution is set to the highest option to capture clear images.
- Edit with Annotations: If the image requires explanation, use arrows, text, and highlights to clarify the message.
- Focus on the Essentials: Avoid clutter by zooming in on the area that matters, making the screenshot more helpful and easier to understand.
Troubleshooting Common Screenshot Issues
While taking screenshots is generally straightforward, you may run into issues. Here are some quick solutions:
- Print Screen Key Not Working: Check if the
PrtScnkey is disabled or if another app is using it. You may also need to enableFnkeys for some laptop models. - Screenshot Doesn’t Save Automatically: Make sure that the default storage location has sufficient space. Some Windows settings also allow you to change the default folder.
- Mac Screenshot Tool Not Working: Restart the Mac, check for system updates, and ensure the keyboard shortcuts are properly enabled.
Taking screenshots on a laptop is an essential skill that can save time and help you communicate more effectively. Whether you’re using a Windows PC, a MacBook, or a Chromebook, this guide provides step-by-step instructions for capturing, saving, and editing screenshots. With these tips, you’ll be able to take professional-quality screenshots quickly and easily.


